Very Basic Tent
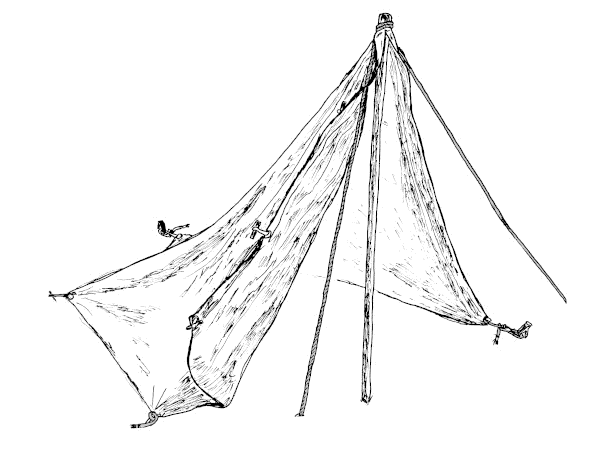
Figure 1: Tent.
I don't remember where I first saw this design, sometime while I was doing things
with the Boy Scouts. But there isn't anything about it that couldn't
have existed in the late 1700s. All the material, and all the techniques used in
building it are period correct.
Design
Many of the tents you see at Colonial era gatherings are nice, big, comfy tents, with room
for two beds, a box or two, maybe even a stove. This is not one of those.
The soldiers of the Continental Army often had to improvise
shelter[773],
so civilians probably made do without formal tents, also.
I portray a rural ropemaker, who doesn't have a lot of money, and nothing to haul a lot
of equipment in. The tent needed to provide reasonable shelter for one person, maybe two,
and a little bit of equipment. I wanted enough room to sit up, but don't need to stand up.
It had to be something that could be packed on a
mule
with the rest of my gear.
(I haven't built out the whole inventory of the stuff I haul around yet.
I might end up needing a second hypothetical mule.)
Several people have marveled at the small size of the tent. Yet it has more floorspace
than many modern two person backpacking tents.
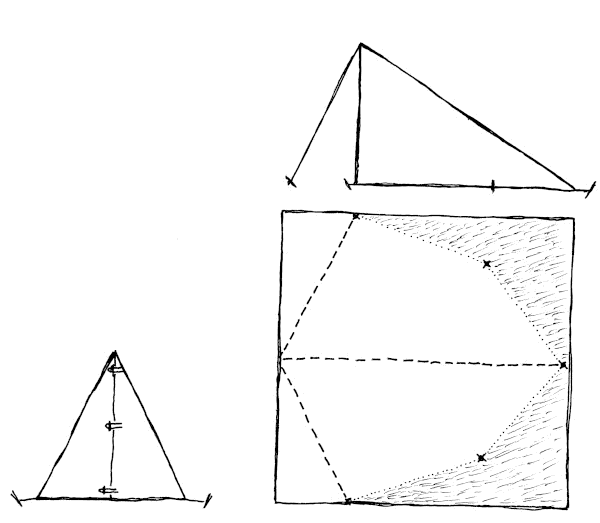
Figure 2: Layout of the Tent. Xs Mark Tie Points.
I wanted to be able to easily open and close the door from either the inside or the outside,
in the dark, with cold fingers. Earlier versions of this tent used the "pebble" method,
Figure 6 below,
to attach strings to tie the door closed. This either meant you could only tie the door
closed from one side, or there were gaps for rain and wind.
The web sources at the bottom of this page are for similar set ups using a simple
rectangular tarp. The earliest source is 1916, but this tent could easily have been
made in the 1700s from an old piece of sail.
Parts
- 12 foot by 10 foot heavy canvas tarp.
- 50 feet of 3/8 inch rope.
I was lucky enough to get some nice hemp rope, so I've used that.
- 12 inches 3/8 inch oak dowel for the toggles.
- 7 tent stakes.

- 6 foot tent pole.
Mine is currently a piece of 1 x 2 inch hickory, but I used hardware
store 2 x 2 white pine before that. Cut the pole long, so you can adjust
it when you set up the first time.
(Note: You can cut the stakes and pole on-site, and save that much packing
weight. Just be sure you have permission before you start chopping up the woods.)
- Five round pebbles, black walnuts, something round for the tie points.
Musket balls might be too small for the 3/8 inch ropes I'm using.
If they work for you, please let me know.
All dimensions are nominal.
Construction Details
- On one long edge of the canvas, fold and stitch a 3 inch deep hem. This will
be the side of the canvas that becomes the door of the tent.
- Fold the hemmed edge, and the rest of the tarp, in half.
This fold will be the ridge line of the tent.
- On the door hem, mark positions for the three door toggles.
- One mark about eight inches from the ridge fold.
- One mark about two inches up from the edge of tarp.
- The last mark half way between the first two.
- Make three - one inch diameter twine
grommets.[780]
[470]
[860]
[604]
These references have better descriptions of making grommets than I can provide.
For now.
- Cut one half inch crosses in the middle of the door hem, at each of
the marks, on one side of the door, and sew the grommets over the holes.
- Cut three - one foot long sections of the hemp rope. Fold each length
in half, and
seize[860]
[215]
four inches, leaving a two inch loop.
- Stitch the loops over the marks on the other side of the door hem. Make
the loop part hang over the edge of the hem.

Figure 3: Door Loop.
- Cut an 18 inch piece of the hemp. Unlay the rope, and make three
six inch circumference grommets.
- Make a groove in the center of each of six - two inch dowels, and
seize one into each grommet.
- Stuff the toggle grommet through one of the door grommets.
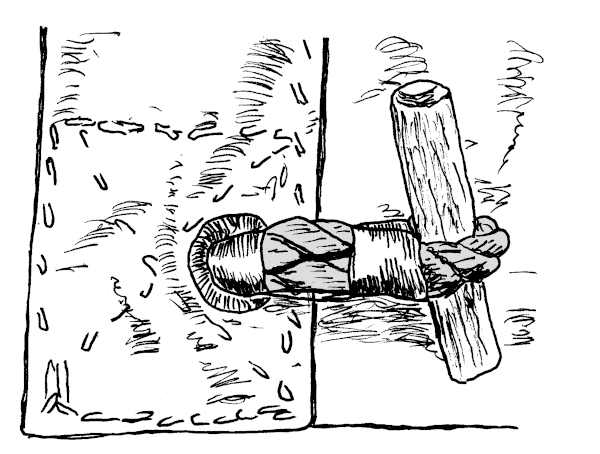
Figure 4: Toggle Inserted into Door Grommet.
- Seize another toggle on the other end of the toggle grommet.
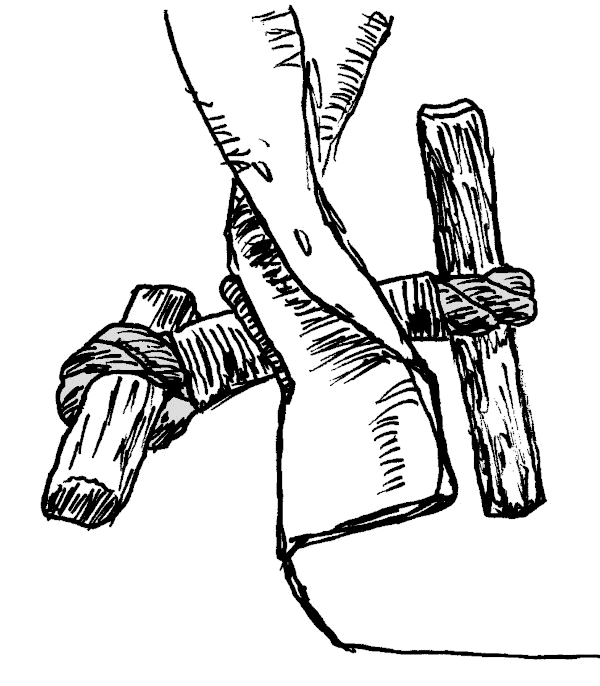
Figure 5: Second Toggle Seized into Grommet.
This gives you a toggle on the inside, and one on the outside, so you can
easily open and close the tent from which ever side you happen to be.
- Cut five - five foot lengths of 3/8 inch rope, and whip all of the ends.
ABOK[040] #3442
- Push a pebble up from under the end of the ridge fold, about two inches
from the edge opposite the door hem, and tie one of the five foot lengths around
the canvas and pebble with a constrictor knot.
ABOK[040] #1249
This is the anchor rope for the foot of the tent.
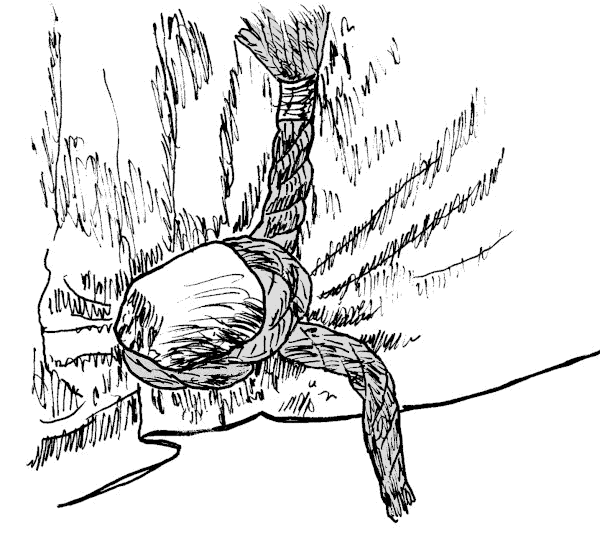
Figure 6: Anchor Tie Point.
- Tie two more pebbles, in a similar manner, on the edges adjacent to
the door hem, at a distance one quarter the length of the door hem. On
a 12 x 10 foot tarp, this will be about 3 feet. These are the front anchor
ropes.
- There are two more tie points, but those will be set the first time you set up the tent.
- Cut a groove around the top of the tent pole, an inch or so
from the end. A rattail bastard (one of my favorite tool names)
is great for this.
- Fold the center of the door hem over the top of the tent pole.
Secure this with a constrictor knot tied in the center of a
twenty foot piece of rope. The rope should snuggle into the
groove at the top of the tent pole.
These, obviously, are the tent pole ropes.
Set Up
To set up the tent:
- Drive a tent stake near where you want the foot of the tent to be.
- Tie a Taut Line Hitch with the foot anchor rope around this stake.
(ABOK[040] #1800)
- Make sure the door flap toggles are in their matching loops.
- Pull the tent pole up vertical, and anchor it with the two tent pole
ropes to two more tent stakes.
- Pull out the front anchor ropes so the door is vertical, and the door
is square to the ridge line.
- Move down the side of the tent about five feet, and pull out the edge so
it's perpendicular to the door, and the line to the foot of the tent is tight.
- Put a pebble in this spot, about two feet from the edge,
secure an anchor line with a constrictor knot, and tie out to a tent stake.
Repeat on the other side.
- Go around the tent and tighten up the Taut Line
Hitches.
- Go inside and smooth out the triangular flaps on
the inside of the tent.
- These are the shaded areas in Figure 2.
- Adjust the tent pole rope stakes so the ropes follow the slope of the
side of the tent, and are far enough forward so they can hold the door flaps
straight out. Or not. It's easy enough to just flip the flaps out over
the side of the tent.
The first time I set up my tent, there was a six inch gap under the door. So I cut
six inches off the bottom of the pole. Problem solved.
Packing
- Close and fasten the door flaps.
- Pull up the tents stakes.
- Lay the tent out, folded along the ridge line, with the tent pole
inside the tent, perpendicular to the ridge line.
- Roll the tent up around the pole, tucking all the ropes and stakes
inside.
- You can use the foot anchor rope to tie up the bundle,
but I've found that two ropes, not part of the tent rigging, are easier to tie,
and make useful handles.
When taken down and rolled up, the tent makes a bundle six feet long, nine inches in diameter,
weighing 20 pounds.
Dog Bones
You'll see rope tensioners, commonly called "Dog Bones", at
every encampment and market fair you go to.
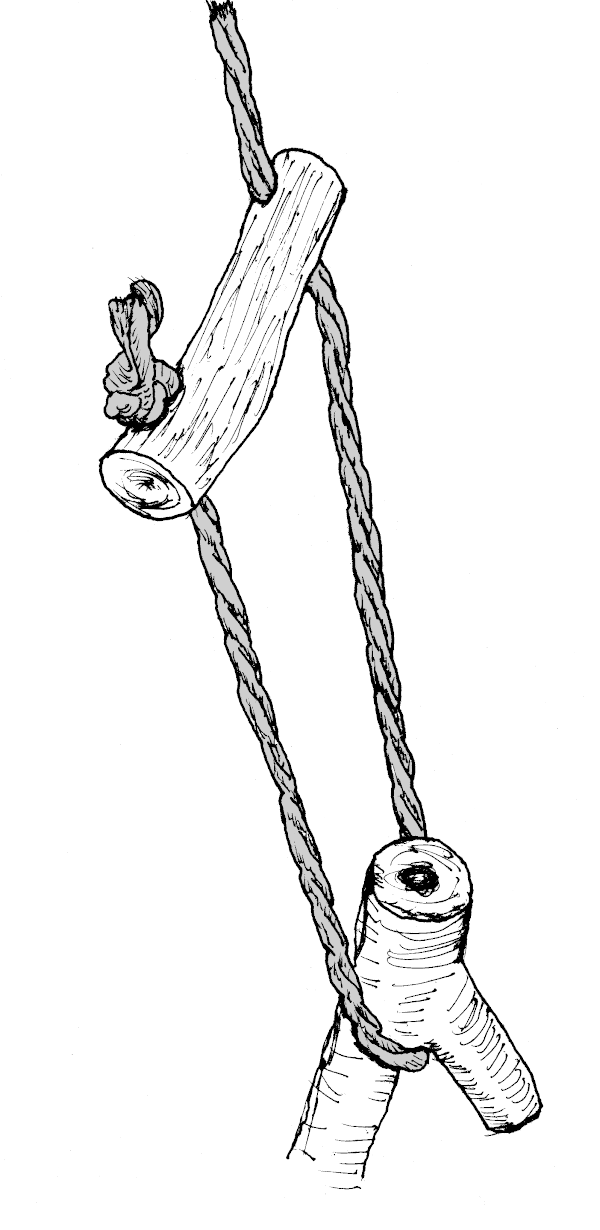
Figure 7: Dog Bone - Tent Rope Tensioner.
As a ropemaker, I believe in showing off the things you
can do with rope, so I don't use dog bones, I use Taut
Line Hitches
(ABOK[040] #1800)
instead. Hitches take only a few minutes to learn, you
don't have to untie them when you break camp, they don't
get lost or broken, and they are easier to pack.
There are plenty of descriptions and plans for tent rope
tensioners. Some require a lathe, some are cast metal.
The one in the Figure 7, above, was made from a branch that
didn't make it into the camp fire. Cut about five inches
off a branch or piece of wood somewhere over an inch wide,
drill two holes, and you're done.
Evidence for dog bones in the Colonial Era is not hard to
find. They were used on George Washington's
tent.[989]
But just because the Commander in Chief of the Continental Army
used dog bones on his tent doesn't mean you need to.
To be honest, a dog bone is easier to adjust on a
wet tent rope, on a cold, drizzly morning. Next time
it looks wet, I'll use a Trucker's
Hitch (ABOK[040] #2124) tied with an Alpine Butterfly,
or Lineman's
Loop (ABOK[040] #1053).
Disclaimer
I haven't used this tent in real wet weather. Yet. So far, it's come through heavy dew and moderate to
strong winds just fine. Updates as they become available.
Update: October 2021. This weekend slept quite comfortably in 20 mph wind and half
an inch of rain.
It is important not to touch the inside surface of any canvas tent when
it's raining. That'll cause an immediate leak. Just in case you forgot.
Update 2: May 2024. It bucketed down rain, and the
wind blew. My tent was protected, somewhat, from the wind,
but got every bit of the rain. My toes got damp because
they rubbed against the foot of the tent. But wool socks
and wool blankets kept them from being cold.
But Sometimes...
A tent is nice for protection from the environment and a little
privacy. But sometimes, when the forecast doesn't include rain,
and there's just enough breeze to keep the bugs down, sleeping
out on a blanket with just stars for your canopy is the way
to go.
Bibliography
Abercrombie & Fitch Co. (1916)
Waterproof Tarpaulin Tent - Page 10.
Accessed 18 July 2021 from
https://archive.org/details/abercrombiefitch00aber/page/10/mode/1up?view=theater
Backcountry Hunters & Anglers (26 September 2013)
Woodsmanship 101 - "take a tarp"
Accessed 18 July 2021 from
https://www.youtube.com/watch?app=desktop&v=AJxBEQRKiHM
Fordyce, C. P. (1922)
Touring Afoot
The Tarpaulin Tent - Page 82.
Accessed 18 July 2021 from
https://www.gutenberg.org/files/47906/47906-h/47906-h.htm
Snuff, Mary Hazel (1918)
A Study of Army Camp Life During American Revolution
Accessed 05 April 2023 from
https://www.gutenberg.org/cache/epub/55957/pg55957-images.html


