Rope Spinners

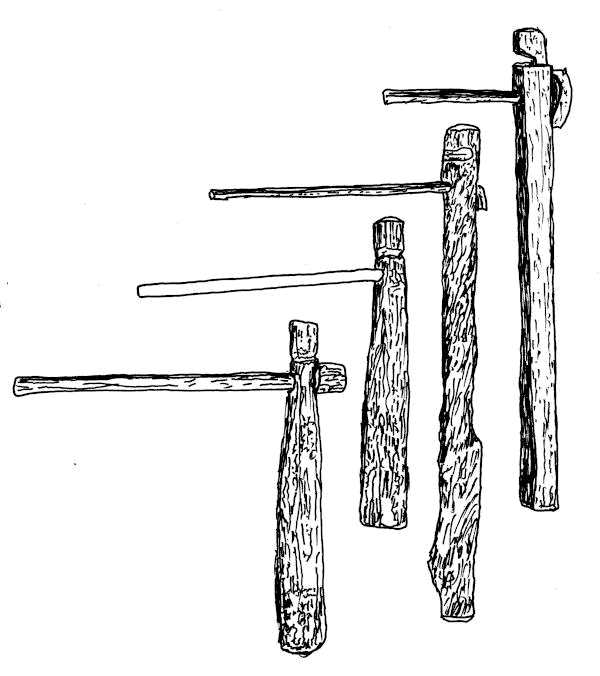
Figure 1: A Collection of Rope Spinners.
A spinner is just a piece of wood (generally), many times longer than it is wide,
that can swing freely on a hand-held axle.
The choice of materials is huge, limited only by what's on hand, or what you
can afford.
Additional names for this type of tool are:
Spinner, Mayan spinner, rakestraw spinner, rope spinner, twister, rope twister,
hair twister, twisting paddle, whirligig, tarabilla, tarrabee, tarabi, tarabe, taravia, taravilla, taravita, torteiral
or
torneiral.[840]
[420]
[977]
This tool is most often just called a "Rope Spinner" because it's used to spin rope, and
English ropemakers just aren't clever with names.
Design
Things to consider when making a rope spinner:
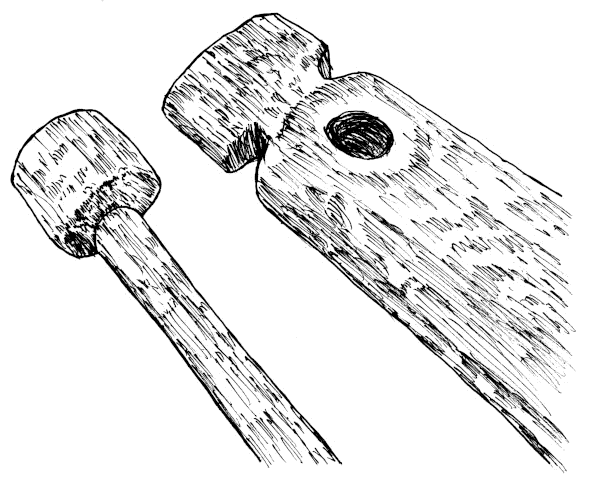
- You want the Body (Figure 2, right) to swing freely on the Axle (Figure 2, left).
- The hole in the Body and the end of the Axle furthest from your hand need
to be as smooth as possible.
- A little (bacon) grease helps here.
- You need a good solid stopper on the end of the Axle to keep the Body from flying off.
- Position of the notch or groove.
- If you are only going to be spinning pre-made yarns, the notch can go
above the Axle hole. This makes slipping the finished rope off the Spinner easier.
- If there is a chance you will be using the Spinner to make yarns from raw fibers,
then put the notch below the Axle, and you can wrap the growing yarn
around the Body.
- Of course there is no reason you can't have two notches, one on either
side of the Axle.
- You want a reasonable amount of weight in the Body.
- More weight means more momentum in your swings
which keeps the rotation more even.
- More weight means you tire faster.
- Too little weight, and the torque in the twisting rope
will fight your efforts to spin the Spinner.

Figure 2: Working Parts of a Wooden Rope Spinner.
Axle on the Left, Body on the Right.
Axle
The Axle on the left in Figure 1, and in Figure 2, was made from a piece of ash.
It was trimmed down to a rough 3/4" dowel, about 10 inches long. A groove was
cut about 3/4" back from one end, just deep enough that the remaining center would
fit in the hole of the Body. The extra, outside wood on the Axle was
then carefully split off, and the finished shaft was sanded and smoothed.
The other three Axles in Figure 1 are, from left to right:
- A hardware store metal spike, with the point cut off and the shaft under
the head smoothed down.
- A piece of round stock, with a 90 degree bend at one end.
- A long hardware store bolt with the threads cut off and the shaft smoothed, with
a wooden washer to keep the bolt head from rubbing a bigger hole in the Body.
Body
You can find very detailed instructions for size and shape of the
Body[305] in reference
books, but there really isn't any need to get fancy.
The first two Spinners in Figure 1 (from left to right) were split from some oak fire wood,
then smoothed to get rid of splinters. A little extra care was taken around the hole,
so the Body would swing cleanly and not catch on the Axle head.
The third Body was just an interesting branch I found somewhere. I liked the
looks of it, drilled a hole, cut a groove, and that was it.
The last Body in Figure 1 was made from an old broken tobacco stick - probably oak.
Assembly
Simple. Slide the spinner Body over the Axle until it hits the Axle head.
Grab the other end of the Axle.
See the section on Spinners if you need help
on how to use your new Rope Spinner.


