Reels
Reels are used to twist fibers into long lengths of single strand yarns.
The two basic types of reels are
two-armed[990]
[1014]
[1030],
and four armed[110]
[973]
[1005]
[1010]
[1040].
I wanted something I could use to quickly make single-ply yarns on my own.
Cranks and
crooks are a two person task.
With a reel, I can make plenty of home-made yarns for the next steps in making
finished rope, without going to the hardware store.
The two reels described here are my interpretations of reels seen in books
and on-line. There is no reason you have to assemble your reels the same way
I did. These were the methods that made sense to me at the time. Then next
one will most likely be different still. It's not like there were factories
turning these things out by the thousands. Experiment. Let me know what you
come up with.
Two-Armed Reel
The two-armed reel is also known as a
"winding frame".[990]
Design
I needed something that could knock down to the smallest possible size, and fit
into a rigger's bag.
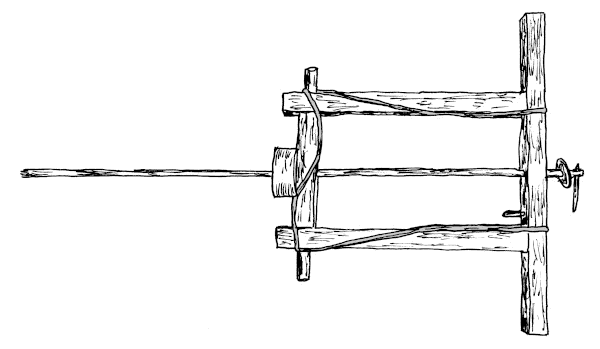
Figure 1: Two Armed Ropemaker's Reel.
Assembly
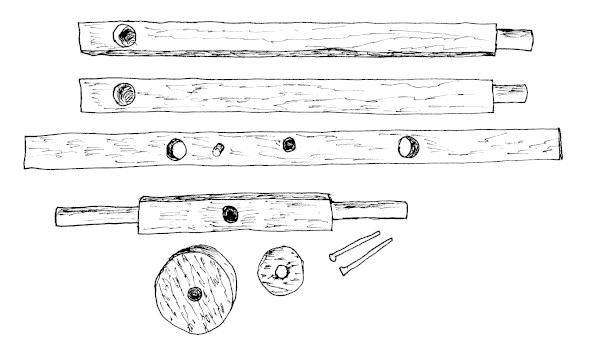
Figure 2: Parts for a Two Armed Reel.
In Figure 1, the right side of the picture is the front of the reel, where you
stand when twisting yarn.
The front bar and the two horizontal rails are about ten inches long. The
back piece is eight inches long. All four pieces are nominal one inch square oak.
The distance between the outside edges of the horizontal rails is six inches,
so once around the reel is a foot of yarn (give or take a bit).
Everything rotates on a 1/4" iron axle, two feet long.
- Drill the hole in the middle front bar. Just slightly bigger than the
iron axel.
- Mark three inches on either side of the middle hole.
- Lay the horizontal rails inside the marks, and mark where their inner
edges lay across the front bar.
- Drill a hole between the inner and outer marks at each end of the
front bar. Make the hole one half the thickness of the horizontal rails.
- I added a brass pin on the inside of the front bar to anchor the first wisp
of fibers. You can get by just looping the fibers around part of the reel,
but the pin makes it a bit easier to separate the finished yarn from the reel
when the time comes.
- Mark the thickness of the front bar on the horizontal rails, at the end that will be
the front.
- Carefully trim the ends of the horizontal rails so they fit into the holes
in the front bar.
(See Figure 3, below.)
- Drill a hole, diameter half the width of the rail, at the other end of each horizontal rail,
about an inch from the end. You can go closer to the end, but I wanted plenty of wood
to help prevent splitting.
- Trim the ends of the rear bar to fit the holes in the rails. Make the back bar long
enough that the ends stick out past the horizontal rails. This will keep your yarn
from sliding off the back of the reel. It also provides a wrapping point when
you lace the frame up.
- Drill a small hole each end of the iron axle. These are for the cotter pins to
keep the reel from sliding off, and the axle from sliding out of its holder.
- Cut two wooden washers. One should be thicker that the back ends of the horizontal
rails.
- Slide the tenons into the drilled holes. Wrap and tie a cord around the frame
as shown in Figure 1 to hold it all together. For a permanent solution, glue the
tenons in the holes. Maybe pin the tenons in from the side, or wedge them from
the end.
- Slide the frame on the axle, slide the washers on, slide the axle into any handy
holder, and wedge pins in the holes at either end of the iron axle.
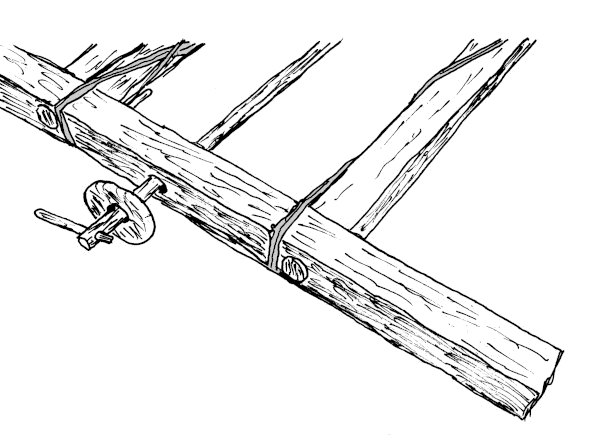
Figure 3: End of Two Armed Ropemaker's Reel.
Knocked down, this reel makes a package 2" by 2" by 1'. With the iron axle
sticking out a further foot.
Four-Armed Reel
This reel isn't as portable as the one above. It doesn't knock down
conveniently, and takes up a lot of empty space when packing.
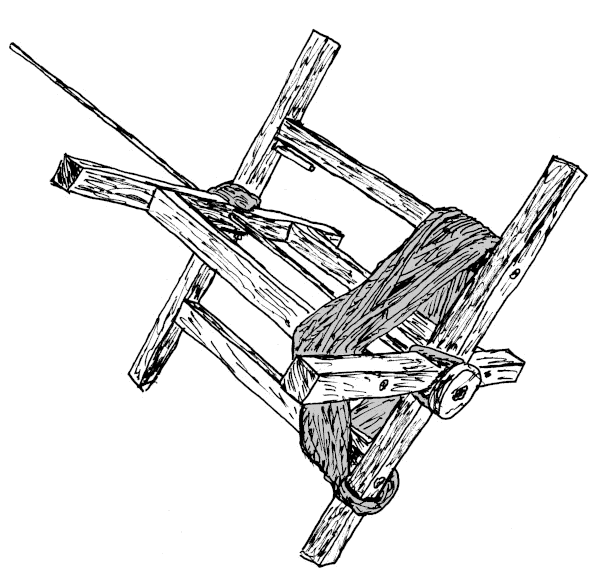
Figure 4: Four-Armed Ropemaker's Reel.
Assembly
This reel is made from nominal one inch square oak.
- Cut the four front and back bar pieces 10 inches long.
- Join the two pieces for the front cross with a half-lap joint.
Repeat for the back cross.
- Glue the joints and let them dry.
- Drill holes in the center of each joint for the axle.
- Measure out 6 3/8" from the center on each of the crossed bars.
This will give a distance of nine inches between the horizontal rails,
meaning once around the reel is one yard.
- Cut the four horizontal rails at a length that suits you. The ones
shown in Figure 4 are the same length as the cross bar pieces.
- Use one of the horizontal rail pieces to mark the distance inside
the 6 3/8" marks.
- Drill holes one half the thickness of the horizontal rails between
the inner and outer marks on the cross bars.
- Use the thickness of the cross bars to mark back from the ends of
the horizontal rails.
- Trim the ends of the rails so they fit snugly into the holes in the
cross bars.
- Either pin the rail ends from the side, or wedge them from the end.
I sawed a slot down the length of the round rail ends, then glued
and wedged them in place.
- The axle is 1/4" iron round stock. I had a blacksmith flatten the end
of the axle so the reel won't pull off. Right now, the back end
of the axle is cut square, but I might get a smith to sharpen that end
so it can be driven into a wall or post. But that means another
sharp thing to look out for when packing.
- Cut two wooden washers just to keep things rotating smoothly. These are
really handy if you run the reel in the vertical position, like is
shown on the Home Page.
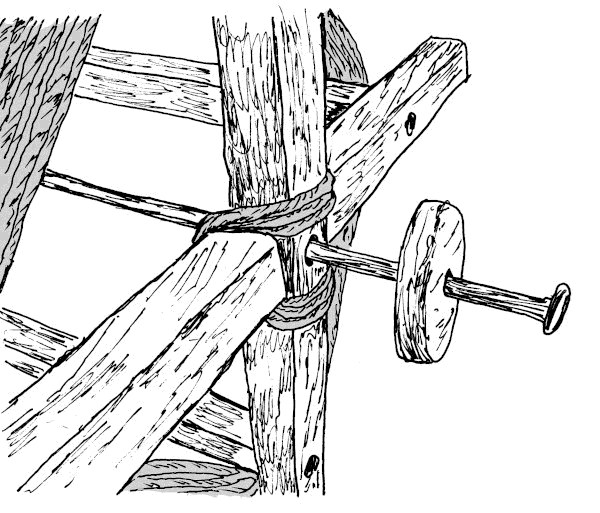
Figure 5: End of Four Armed Ropemaker's Reel.
Hand Reel
In 2023, I came across Erik Brinkman's page on bast ropemaking
in northern
Europe.[105]
In it, he has an early illustration of a ropemaker spinning yarn
with a hand held reel.
I had to try it.
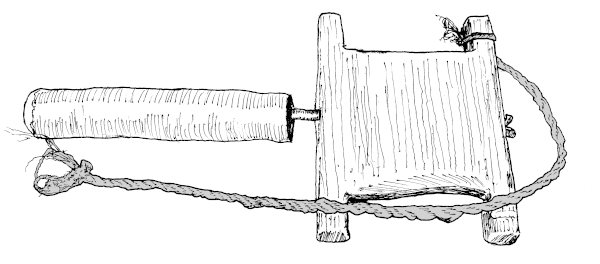
Figure 6: Ropemaker's Hand Reel.
The main part of the reel was a five inch long piece of 1 x 4" oak
scrap, the axle was 1/4 inch round stock, and the handle a piece
of a tree branch, maybe cherry, about an inch in diameter.
Assembly
- Cut the two side cut-outs, each one inch deep, in the
main reel body.
- Drill a 5/16" diameter hole through the reel body.
- Split one end of the round stock about 1/2 inch, and spread
the two halves. This will keep the main reel body from
sliding off.
- Gently flatten the other end of the round stock, so it
will fit tightly into the handle.
- Drill a 1/4" diameter hole into one end of the handle.
- Slide the main reel body onto the axle, make sure it turns
easily.
- Lubricate the inside of the hole in the handle with
epoxy cement (or other adhesive of your choice) and
slide the end of the axle down the hole.
When I first tried spinning yarn with this reel, the fibers kept
slipping off the front ears, so I filed a groove in each ear.
Problem solved.
I had a hard time twisting yarn holding the reel in my hand, as
shown in the original
illustration.[105]
I ended up clamping the handle to my bench, and using this reel
like the two shown above.
Once the yarn was twisted, however, the hand reel did a good job of
twisting the yarn for folding.
Perhaps not as fast as you can do with
a spinner
but maybe faster than you can twist with
a crank. This is now a
permanent part of my tool kit.